Showing posts with label Scouts BSA. Show all posts

October 12, 2022

Two-Way Radio Communication for Scouts

Radio and scouting are a great combination.  Scouting recognizes the interest of scouts in radio and reflects this in the annual Jamboree on the Air (JOTA) and the Radio Merit BadgeJOTA is the world's largest scouting activity.


Scouting is the ideal time to earn an amateur radio license.  Making your first amateur radio contact with your own call sign as a scout is amazing experience. Making contact with your other scouting friends is even more fun.

Scouts BSA Radio Merit Badge

A two-way radio is also an important piece of communication and safety equipment on backcountry outings where mobile phone coverage is absent.  Scouts can use FRS walkie-talkies to communicate with each other while at camp or hiking with no license required.  Amateur radio licensed scouts can use their own amateur radio two-way radios.  Regardless of the class of equipment, it is important for scouts to learn good radio operating practices.  Here are some helpful guidelines to good operating practices based on the Scout Law.

Good Operating Practices

  • Be prepared - Think about what you are going to say before transmitting.

  • Be trustworthy - Take care of troop radios and return them in the same condition they were issued.

  • Be loyal - Keep your antenna in a vertical position and elevate it to improve signal strength.  If you are in a structure, try moving near an open window or moving outdoors to improve signal strength.

  • Be helpful - Press the push-to-talk button and pause one second before speaking.  There is a short delay before your radio begins transmitting.  Pausing will prevent your message from being cut off.

  • Be courteous - When initiating a transmission, first identify your intended recipient then identify yourself.  This avoids confusion on shared frequencies.  Example: “Jill this is Jane, do you copy?”

  • Be kind - Give the person you are calling time to respond.  Remember, they may have heard your call and are unable to respond immediately.

  • Be thrifty - Use short, clear, and concise messages over the radio to save battery life.  Repeat essential parts of the message to help make sure it is understood.  Keep your radio on and monitor for safety, accountability, and patrol/troop messages.

  • Be clean - Speak across the radio microphone rather than directly into it in order to produce a clear undistorted message.


Scout radio operations also benefit from the use of standardized vocabulary of basic radio terms.  These terms are known as pro-words.

Radio Pro-Words

  • Mayday - Used as a distress call in an emergency situation.  When used, repeat three times: mayday, mayday, mayday.

  • Correction - I made an error in this transmission.  I will continue with the last correct word.

  • Radio check - This means, “What is my signal strength and readability?”  Responses include: “Loud and clear” (or 59), “Weak but readable,” “Weak and distorted,” “Strong and distorted.”

  • Over - I have finished speaking.

  • Say again - Please repeat your last message.

  • Stand-by - This means, I acknowledge your transmission.  Please wait for me to respond.

  • Go-ahead - I am listening and can respond.  Please proceed with your message.

  • I spell - Say this prior to spelling a difficult or ambiguous-sounding word.

  • Read back - Please repeat my entire transmission back to me.

  • Roger - Message received and understood.

  • Affirmative / Negative - Yes / No

  • Out - Our conversation is finished.


The ability of Scouts to communicate using radio under difficult conditions is enhanced by having the ability to spell words using the international phonetic alphabet.  There are times when our spoken words cannot be understood when transmitted over the radio.  This can be caused by a weak signal or high noise levels.  Often, our words can be understood via radio by spelling the words out using the phonetic alphabet.  Knowing how to do this is a critical survival skill for Scouts.

Phonetic Alphabet

A Alpha

E Echo

I India

M Mike

Q Quebec

U Uniform

Y Yankee

B Bravo

F Foxtrot

J Juliet

N November

R Romeo

V Victor

Z Zulu

C Charlie

G Golf

K Kilo

O Oscar

S Sierra

W Whiskey


D Delta

H Hotel

L Lima

P Papa

T Tango

X X-ray


Have fun in the outdoors and be prepared.  Having a radio transceiver and knowing how to use it is an invaluable asset since it provides additional options to communicate in the event of an emergency.


Good DX and 73, NJ2X


October 15, 2021

JOTA 2021

Jamboree-on-the-Air provides the opportunity for millions of Scouts around the world to meet on the air via Amateur Radio.


JOTA (Jamboree-on-the-Air) is the world’s largest Scout event taking place on the over the airwaves. Held every year in October, the event connects millions of young people around the world for a full weekend of online activities that promote friendship and global citizenship. JOTA enables young people and volunteers to participate in fun and engaging group activities over the Internet and amateur radio focused on developing 21st century skills through Scouting.

This year, JOTA takes place from 15 to 17 October. JOTA aims to support young people of all ages to learn about radio communications technology, the values of global citizenship, and their role in creating a better world.

Learn more about JOTA

ARRL JOTA page

I will be operating amateur radio on VHF, UHF, HF, and Echolink all weekend.  See you on the air!

Good DX and 73, NJ2X

June 18, 2021

Amateur Radio Kids Day 2021

Amateur Radio Kids Day 2021 falls on June 19, 2021 

Kids Day always runs from 1800 UTC through 2359 UTC. Operate as much or as little as you like.


The preferred exchange for kids day contacts is: name, age, location and favorite color. Be sure to work the same station again if an operator has changed.  When calling, the suggested call is: “CQ Kids Day.”

All participants are eligible to receive a nice certificate from the ARRL.  Check out the ARRL's kids day web page for more details:


Good DX and 73, NJ2X

January 8, 2021

The great teacher inspires...

This quote echoes the EDGE method - Explain, Demonstrate, Guide, Enable.

‘The mediocre teacher tells. The good teacher explains. The superior teacher demonstrates. The great teacher inspires.’ ― William Arthur Ward


Good DX and 73, NJ2X

December 11, 2020

Evaluating Radio Fox Hunt Alternatives for a Scout Troop

During the Summer of 2020, I taught the Radio Merit Badge for a troop of enthusiastic Scouts.  The scouts had a great time setting up a wilderness radio station and operating on HF, VHF, and UHF.  Part of the curriculum included discussing various radio related activities that amateur radio operators participate in.  The scouts were really excited to learn about amateur radio fox hunting (also known as amateur radio direction finding).  The scouts asked if they could organize a radio fox hunt for the troop sometime.  The answer was of course was an equally enthusiastic, "Yes!"  (I only needed to figure out how to do it first).


Radio fox hunting (also called amateur radio direction finding or radio orienteering) is a challenging amateur radio sport that combines radio direction finding with orienteering map and compass skills.  Radio fox hunting is a timed race in which competitors use a topographic map, a magnetic compass, and radio direction finding apparatus to navigate through diverse wooded terrain while searching for hidden radio transmitters.


The objective of this hunt is to have fun using leadership skills in an inter-patrol competition while also developing radio direction-finding skills.  Teamwork, skills, and speed are all advantages.


When I started working on an approach for a radio fox hunt I began with the end in mind by drafting a set of requirements:
  • Waterproof - We don't get much rain here in Northern California.  However, we can experience huge downpours during the rainy season that starts with the onset of Winter.  The  electronics need to stay dry rain or shine.
  • Sufficient Battery - The transmitter equipment for the hunt will transmit on a 50% duty cycle for the duration of a hunt and demonstration / practice prior to the hunt.  The total operating duration will likely be between 120 minutes and 150 minutes.  The transceiver will likely be run on low power.  Battery storage that will support 4 hours would probably be good enough.
  • Stealthy - The fox transmitter will need to be hidden from view from both hunters and passers by.  The transmitter profile needs to be discreet and easily hidden behind weeds or inside a bush.  Camouflage or dark color would be appropriate.
  • Labelled -  The transmitter needs to be labelled to inform a finder of its purpose in the event of accident discovery.  The label will also help a radio fox "hound" quickly confirm she has found the transmitter during a hunt.
  • Secure - Provide the ability to secure the radio fox transmitter to a tree with a bicycle cable lock to deter theft.
  • Auto ID - The fox transmitter needs to be able to identify the call sign every 10-minutes per FCC rules.
  • Intermittent Transmission - The fox transmitter needs to alternate between sending a signal for the hounds to locate and then going idle with no transmitted signal.  A 50% duty cycle of 15 seconds on and then 15 seconds off would be about right.
  • Lightweight - The fox transmitter device needs to be relatively lightweight to promote easy portability as part of backpacking outing or hike.  This limits the weight to a couple of pounds maximum.
Armed with requirements, I researched various options for setting up a radio fox transmitter.  I identified three basic alternatives:
  1. Transceiver + radio CW beacon - Use a 2m handy-talkie as a transmitter interfaced with a CW beacon controller.
  2. Transceiver + radio fox controller - Use a 2m handy0talkie as a transmitter interfaced with a fox controller.
  3. Dedicated integrated radio fox transmitter - These are special purpose radios with a built-in radio fox controller.

Option 1: Transceiver + Radio CW Beacon

Pros
  • Lowest cost since existing equipment could be repurposed
  • Easy to setup
  • Flexible frequency and power (determined by the transceiver)
  • CW beacon could be paired with different radios
Cons
  • Not a commonly adopted approach for radio fox hunting
  • A CW signal could be more challenging for new fox hunters to locate with rudimentary techniques such as body fading.
  • Requires an additional battery pack
  • Requires a waterproof container to deploy

Option 2: Transceiver + Radio Fox Controller

Pros
  • Proven effectiveness in radio fox hunting
  • Likely easier for new radio fox hunters to locate with rudimentary techniques such as body fading
  • Flexible frequency and power (determined by the transceiver)
  • Fox controller could be paired with different radios
Cons
  • Additional expense in purchasing a radio fox controller
  • Requires an additional battery pack
  • Requires a waterproof container to deploy

Option 3: Dedicated Integrated Radio Fox Transmitter

Pros
  • Proven effectiveness in radio fox hunting
  • Smallest physical size and lightest weight - easiest to hide - stealthy
  • No additional battery pack required
  • No additional waterproof container required
Cons
  • Additional expense in purchase a integrate radio fox transmitter
  • Highest cost approach
  • Low power with no options
  • Fixed frequency / less flexible in terms of frequency

After considering the pros and cons of the three options, I decided to start with Option 1 by pairing a vintage 1990's 2m Kenwood HT with an existing CW-keyer that I had available in the shack.  This option would provide a zero-cost opportunity to experiment with using a CW beacon for radio fox hunting.  In my next post in this series, I will share how I configured my first fox transmitter and what I learned in the process.


Good DX and 73, NJ2X

October 19, 2020

2020 Jamboree on the Air

My daughter (KN6JYE) and I (NJ2X) had fun this past weekend (October 16-18, 2020) participating in the annual scouting Jamboree on the Air.  JOTA is the world's largest scouting activity and involves scouts all around the globe getting on amateur radio and having fun.

We had a blast talking with scouts and scouters in The Netherlands, Brazil, Australia, and the USA.  Scouting and amateur radio make a great combination.

JOTA 2020


Good DX and 73, NJ2X

August 21, 2020

Radio Scouting: Earning the Radio Merit Badge at Summer Camp


The Radio Merit Badge was earned by 5,205 Scouts in the US in 2018 representing a 10.9% drop from the year prior.  We hams need to make sure we step up our support of scouting and act as counselors for the radio merit badge.  The Radio Merit Badge requirements are demanding and require both classroom learning as well as applied learning in front of a radio.  The radio merit badge looks great on a scout uniform sash with its wonderfully designed Morse code message and lighting bolts.


Scouts BSA Radio Merit Badge

I had the privilege to teach the radio merit badge with my daughter's Scouts BSA troop while at summer camp in the Sierras in Northern California in 2020.  We had a small group of scouts and parents which provided the scouts with more radio operating time and more time for discussion and questions about radio.  This made the merit badge class sessions more fun and engaging.

The scouts had a blast learning hands-on on how to setup the entire wilderness radio station including:
  1. Generator
  2. Power supply
  3. Kenwood TS-480SAT (HF+6m transceiver)
  4. Yeasu FT-8800 (2m / 70 cm FM transceiver)
  5. Kenwood TH-F6A (triband FM HT)
  6. External speaker
  7. 40 Meters home brew wire dipole
  8. 20 Meters rotatable dipole
  9. VHF/UHF antenna
Emergency communication rotatable dipole and VHF/UHF antenna packed up in its storage bag


The scouts made numerous contacts on 40 Meters, 20 Meters, 2 Meters, and 70 Centimeters.  We also tuned up and down on the shortwave broadcast bands and listened in on various programs from around the world.  This was an eye opening experience for the scouts who had never heard shortwave broadcasting nor made amateur radio contacts before.

Kenwood TS-480SAT Transceiver

The rotatable dipole worked like a champ having been serviced in the work prior to camp.  While on the workshop bench before camp, it was discovered that one of the elements had developed a break due to corrosion.  The repair was straightforward requiring a quick cleaning of the corrosion, resoldering, and shrink-wrapping.  The rotatable dipole helped demonstrate the directional nature of dipole antennas to the scouts.

Emergency communications rotatable dipole with VHF/UHF Antenna on top setup at summer camp 


One of our scouts, Sadie, earned her FCC Amateur Radio Technician license (KN6JYE) just prior to arriving in camp.  She had a blast using her license for the first time on VHF/UHF simplex calls, calls over area repeaters, and checking into various area nets including a fun 2m simplex net.  By the way, Sadie and her troop are running a popcorn fundraiser to help keep their scout program going.  Please stop by Sadie's Trails End popcorn storefront to make a purchase and support scouting and her troop.

Sadie, KN6JYE making contacts at elevation 3187m on top of Mount Lassen, California

The scouts were amazed and excited to experience the thrill of DX communication for the first time.  We made contacts on 40 Meters to other states and countries including Hawaii and New Zealand.  DX is alive and well even at the bottom of the solar sunspot cycle.

Amateur Radio Operator scout uniform strip

A big THANK YOU to the patient hams who talked with the scouts and helped them log their very first amateur radio contacts.  These hams helped the scouts to successfully earn their radio merit badges and we couldn't have done it without them.  It is the hands-on learning and radio operations that is the most inspiring and engaging aspect of the radio merit badge.  Several of the scouts expressed their enthusiastic interest in earning their own amateur radio licenses.  Please support scouting, radio merit badge activities, the annual Scout Jamboree on the Air (JOTA) special event, and youth learning the ropes on the air.  The next generation needs our support and encouragement just as much as we all did when we were their age.  Remember, it is youth who are the future of the amateur radio.

Good DX and 73,

NJ2X


July 20, 2020

Anticipation is ... Monitoring the FCC ULS

There is nothing quite like the feeling of happiness and anticipation monitoring the FCC ULS after passing your FCC Technician exam.  What will my call sign be?  I hope it is a good one.  Wouldn't it be amazing if it included my initials?  Has my new call sign posted yet on ULS?  How about now?  Better check again a little later... Where is it!?  Cue the Carly Simon song, anticipation... is making me wait.  

The wait is part of the journey and part of the joy of becoming a ham.  It is just as much fun for Elmers too.


Good DX and 73, 

NJ2X

July 5, 2020

Backpacking Hack: Packing Duct Tape

I recently returned from a wonderful backpacking trek in the John Muir Wilderness located in the Sierra Nevada Mountains of California.  The John Muir Wilderness is rugged and exceedingly beautiful.  It is also challenging backpacking country with high altitude and difficult terrain.  The trek tested our group's skills, readiness, and fitness.  Fortunately, we were well prepared and able to handle every test mother nature presented us.

John Muir Wilderness Marker
One item in my pack proved its usefulness over and over again - duct tape.  Duct tape is not just for air ducts or home repairs.  Here are just a few uses of duct tape while backpacking:
  • Repair a pair of shoes by re-affixing a delaminated tread with duct tape
  • Repair a tear in a tent stuff-sack with duct tape
  • Patch a puncture in a water bag with duct tape
  • Secure a moleskin pad with duct tape to prevent it from rubbing off while walking
  • Cover a hip abrasion caused by a backpack with duct tape to prevent further injury
  • Wrap a sprained ankle with duct tape to support the join and prevent further injury
  • Whip an end of rope to prevent fraying
  • Patch a torn tent bag
If you aren't carrying duct tape in your pack then you will inevitably find yourself wishing you had.  Fortunately, you don't have to bring a bulky and heavy roll of duct tape to benefit from this miracle material.  Several feet of tape will do.

A helpful method of packing duct tape is to roll several feet onto a plastic medicine bottle.  The width of the duct tape fits perfectly on the bottle and adds very little weight or volume to a pack.  This hack also provides you with a waterproof container for medicine or small items.  Later, when a length of duct tape is needed, simply peel off the desired amount from the medicine bottle.

You don't need to pack the whole roll

I hope this article has inspired you to add duct tape to your backpacking kit and try rolling it onto a plastic medicine bottle for convenient packing.

Several feet of duct tape rolled onto a plastic medicine bottle

Happy trails and 73, NJ2X


Related Articles:


© Michael W. Maher and NJ2X.COM, 2020. Unauthorized use and/or duplication of this material without express and written permission from this blog’s author and/or owner is strictly prohibited. Excerpts and links may be used, provided that full and clear credit is given to Michael W. Maher and NJ2X.COM with appropriate and specific direction to the original content.

June 8, 2020

How to setup backpacking tarp shelters (A-Frame, Lean-To, and C-Fly)

Many backpackers prefer camping with a lightweight tarp shelter versus a traditional tent due to the weight savings, cost advantage, and convenience that a tarp shelter provides.  In this article, I explore the tarp shelter in detail.  I made the switch to backpacking with tarp shelters many years ago and these shelters have served me very well through all kinds of weather and conditions.  I hope this article inspires you to give a tarp shelter a try on your next backpacking adventure.

Tarp shelter in use somewhere in the John Muir Wilderness
What is a tarp shelter?
A tarp shelter is a lightweight and simple shelter consisting of a tarp, 550 cord, stakes, and trekking poles.  There are many different ways to construct a tarp shelter.

Why use a tarp shelter?
A tarp shelter is an attractive alternative to a tent because of its weight savings, low cost, and simplicity.  Weight is an important consideration for wilderness backpackers.  A tarp shelter is also helpful in a survival situation when a tent is unavailable.  A tarp shelter is very inexpensive, costing only a few dollars to construct using a common utility tarp and a few on-hand items.  Tarp shelters are also easy to set up and tear down.  Setup/tear-down speed is an especially nice advantage when it is raining.

What are the disadvantages of a tarp shelter?
Tarp shelters are typically open to the elements on one or more sides, meaning rain, snow, or insects can potentially intrude on your sleep.  Unlike a tent, a tarp shelter does not provide a waterproof pan or offer much protection to your sleeping bag during a heavy rain.  This risk can be mitigated, though, by adding a waterproof bivy sack, which would also add extra warmth, and a small tarp as a floor under the sleeping bag, which would provide an additional layer of protection against dampness.  Also, adding a mosquito head-net would mitigate the risk of insect bites while you sleep.

Condensation is often a challenge with tent camping.  How about with tarp shelters?
Condensation is never a problem with tarp shelters, provided the construction of the shelter includes openings for ventilation.

How many lengths of cord should you pack for use as tarp shelter guy-lines?
I typically pack six lengths of 550-cord for setting up my tarp shelters: two 4-ft lengths (1.2 m), two 6-ft lengths (1.8 m), and two 8-ft lengths (2.4 m).  Packing multiple lengths of cord allows me to set up my tarp shelter in different configurations to fit the conditions.

What types of knots are used for the guy-lines?
I like to use bowline knots and taut line hitches, tying a bowline knot on one end of each guy-line and a taut line hitch on the other end.  The bowline knot is useful to attach to the tarp, while the taut line hitch provides adjustable tensioning when attached to a stake.


Bowline knot

Taut line hitch

What is the optimal height to set my trekking poles for my tarp shelter?
There is no optimal pole height because the pole height will be determined by the type of tarp shelter you decide to build and your needs.  If you want more headroom, increase the height.  If you want better rain runoff, increase the height.  If you want less exposure to the wind or rain, decrease the height.  If you are using the lean-to shelter and want a better view of the night sky, increase the height.  The beauty of using trekking poles and guy-lines with taut line hitches is that everything can be adjusted easily - even in the middle of the night if needed.

Are there any tricks to staking?
When staking, angle the stake away from the guy-line to provide more secure support.  If the ground is soft, place a good-sized rock on top of the stake to help it stay put all night.  Pound the stakes all the way to the ground to reduce tripping hazards in camp and to maximize the holding power of the stake.  Common lightweight metal camping stakes will work fine.  Avoid plastic stakes since they are bulky and not as durable.

Do I need to purchase a special tarp designed for camping purposes, or can I use a common utility tarp from a hardware store?
Inexpensive utility tarps from a hardware store are durable and work just fine and can be purchased starting at around $5 USD.  The inexpensive utility tarps are preferred by those of us who are thrifty or are just getting started in backpacking.  The more expensive backpacking tarps offer more features like durability, versatility, and additional weight savings, and are preferred by through-hikers and the ultra-light crowd where saving grams is the goal.

How do you pitch a tarp for rain?
All of the tarp shelters described in this article will help protect against rain.

What are the pros and cons between the basic tarp shelter options?
  1. Lean-to Tarp Shelter
    • Pros
      • Quick and easy to set up
      • Good rain runoff
      • Good protection from sun, wind, and rain on one side
      • Provides a nice view of the night sky for bedtime meteor-watching
    • Cons
      • No floor, so no protection when setting up on ground that might already be damp
      • Not ideal for heavy wind or rain
  2. A-Frame Tarp Shelter
    • Pros
      • Good rain protection and rain runoff
      • Good wind protection on two sides
      • Flexible
    • Cons
      • No dampness protection when setting up on ground that might already be damp
      • No view of the night sky
  3. C-Fly Tarp Shelter
    • Pros
      • You can still see some portion of the night sky from your sleeping bag
      • Good rain runoff
      • Good protection from sun, wind, and rain on one side
      • The tarp fold on the ground acts as a floor, providing additional protection when setting up on ground that might already be damp
    • Cons
      • A little more complex to set up
      • Requires more stakes than the other shelters (8 stakes total)
      • Limited view of the night sky
What materials are needed to construct a tarp shelter?
  1. Lean-To Tarp Shelter
    • 4 stakes
    • 2 lengths of 550 cord
    • 2 trekking poles or a couple of foraged sticks
    • Tarp
  2. A-Frame Tarp Shelter
    • 6 stakes
    • 2 lengths of 550 cord
    • 2 trekking poles or a couple of foraged sticks, or run a ridge line between two trees
    • Tarp
  3. C-Fly Tarp Shelter
    • 8 stakes
    • 4 lengths of 550 cord
    • 2 trekking poles or a couple of foraged sticks
    • Tarp

What do the tarp shelters look like when set up?
  1. Lean-To Tarp Shelter (shown with a 5-ft x 7-ft tarp)

    • Lean-To Tarp Shelter
      Lean-To Tarp Shelter shown with optional bivy sack
  2. A-Frame Tarp Shelter (show with an 8-ft x 10-ft tarp)
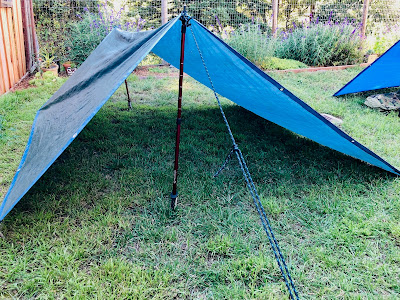
    • A-Frame Tarp Shelter
      A-Frame Tarp Shelter
  3. C-Fly Tarp Shelter (shown with a 6-ft x 8-ft tarp)

    • C-Fly Tarp Shelter
      C-Fly Tarp Shelter
What are the steps to set up a tarp shelter?
It is generally easier to set up a tarp shelter for the first time using a photo as a reference or having an experienced tarp camper guide you.  However, for those who prefer step-by-step instructions, here they are.  Don't worry if you struggle the first time; with practice, you will quickly find what works best for you.

Lean-To Tarp Shelter
    1. Choose your location wisely
    2. Open the tarp and position it
    3. Using two stakes, stake down one side (two bottom corners) of the tarp
    4. Stand up a trekking pole with the handle pointed down and adjust it to the desired height
    5. Attach a bowline loop to a trekking pole tip, insert it through a tarp grommet, then twist the loop and flip it over the trekking pole tip. Cinch the loop so it is firm around the pole tip and tarp grommet.
    6. Attach the taut line hitch to the stake and insert it into the ground so that the cord line is at a 45-degree angle from the corner of the tarp
    7. Repeat steps 4, 5, and 6 for the other tarp corner
    8. Adjust the guy-line tension using taut line hitches
A-Frame Tarp Shelter
    1. Choose your location wisely
    2. Open the tarp and position it
    3. Using two stakes, stake down one side (two left corners) of the tarp
    4. Stand up a trekking pole with the handle pointed down and adjust it to the desired height
    5. Insert the trekking pole into the center grommet of the tarp to form a peak
    6. Using two stakes, stake down the right side of the tarp with the trekking pole in place 
    7. Attach a bowline loop to a trekking pole tip, insert it through a tarp grommet, then twist the loop and flip it over the trekking pole tip.  Cinch the loop so it is firm around the pole tip and tarp grommet.
    8. Attach the taut line hitch to the stake and insert it into the ground so that the cord line is at a 90-degree angle from the tarp
    9. Repeat steps 6, 7, and 8 for the other tarp peak
    10. Adjust the guy-line tension using taut line hitches
C-Fly Tarp Shelter
    1. Choose your location wisely
    2. Open the tarp and position it
    3. Using four stakes, stake down one end of the tarp to make a 'floor'
    4. Stand up a trekking pole with the handle pointed down and adjust it to the desired height
    5. Attach a bowline loop to a trekking pole tip, insert it through a tarp grommet, then twist the loop and flip it over the trekking pole tip. Cinch the loop so it is firm around the pole tip and tarp grommet.
    6. Attach the taut line hitch to the stake and insert it into the ground so that the cord line is at a 90-degree angle from the side of the tarp
    7. Repeat steps 4, 5, and 6 for the other side of the tarp
    8. Pass the bowline knot through the front corner tarp grommet and feed the guy-line through the bowline loop, attaching the cord line to the tarp
    9. Repeat step 8 for the other front tarp corner
    10. Attach the taut line hitch to the stake and insert it into the ground so that the line is at a 90-degree angle from the front of the tarp
    11. Repeat step 10 for the other front corner guy-line
    12. Adjust all guy-line tension using taut line hitches

I hope this article has inspired you to give backpacking with a tarp shelter a try.  A great way to get started is to practice setting up your tarp shelter in your own backyard.  This will help you gain experience and confidence before heading out into the backcountry.

Happy backpacking,

Michael (NJ2X)


© Michael W. Maher and NJ2X.COM, 2020. Unauthorized use and/or duplication of this material without express and written permission from this blog’s author and/or owner is strictly prohibited. Excerpts and links may be used, provided that full and clear credit is given to Michael W. Maher and NJ2X.COM with appropriate and specific direction to the original content.

April 11, 2020

A Ham's Complete Backpacking Checklist for Northern California

So what do you pack for a backpacking adventure in Northern California?  Here is a tried and true checklist we have used on past adventures with good results.  A big thank you to my backpacking partners for sharing their knowledge with me over the years.  Their combined experience along with my own are reflected in this list.

There are several guiding principles to consider when choosing what to bring on a backpacking adventure:
  • Be prepared
  • Be safe
  • Pack the ten essentials
  • Pack as lightly as possible and no more than you can manage

NJ2X with his pack on the trail in the John Muir Wilderness in Northern California


March 28, 2020

Backpacking Amateur Radio Ten Essentials

In my post, Amateur Radio Backpacking Checklist, I offer a list of helpful items to include when backpacking including the "ten essentials".  So what are the ten essentials?


The ten essentials are your non-negotiable life-saving items to include in your pack when you go on any outdoor adventure:
  1. Knife - A knife is an extremely useful tool in the field.  You can use it to make a shelter, prepare food, tighten a screw, carve wood into gadgets, cut 550 cord, ... 
  2. First-aid kit - Backpacking requires self-sufficiency.  When you are are in the backcountry you typically can't call for help.  Your life may depend on your first aid kit.  Mine is a homemade kit stuffed into a lightweight zippered water resistant sack.
  3. Extra clothing - This is a tough one since it easy to overpack clothing and what to pack depends on your location and conditions.  For backpacking in the California Sierras in July, I always minimally bring two pair of wool socks, a fleece, one pair of synthetic pants with zipper-off legs, a wicking t-shirt, and wool knit hat.  For a day hike, I will pack a fleece.
  4. Rain gear - I pack a waterproof rain jacket minimally.  If I know I am going to be trekking in rain then I will pack rain pants.  Staying dry means staying warm and avoiding hypothermia.
  5. Water storage - I carry a US military surplus water canteen on my belt.  I like being able to easily access water while I hike without stopping.  I also pack a full Platypus water bag as backup.  Two containers provides me with peace of mind between refills.  It is also handy to use one to treat water while drinking from the other.
  6. Flashlight - I pack a lightweight headlamp with adjustable brightness that runs on two AA batteries along with a couple of extra batteries.  I use the minimal brightness necessary for the task at hand to conserve battery so they last longer.
  7. Trail food - When backpacking, I pack enough food to last for the entire trip plus an extra day's worth.  An extra day's worth of food is for backup in case of delays.  Pack high protein food (not junk food).
  8. Matches and fire starter - I pack a waterproof container with high quality waterproof stick matches.  I also carry my favorite windproof Zippo lighter.  Fire can mean survival.
  9. Sun protection - I typically wear a broad brimmed hat to protect my face, ears, and neck against the California sunshine.  I also carry a small stick of solid sunscreen.  I wear a collared long-sleeve ventilated shirt that protects my arms, shoulders, and neck.  Long pants protect my legs.  No fun suffering through a sunburn and important to save our skin since we will be needing later in life.
  10. Map and compass - There is no substitute for a good topographic map, compass, and the ability to use both well.  They are lightweight lifesavers.  GPS devices are a wonder of technology and relatively fragile.
  11. Amateur Radio - A 2m / 440 Mhz handy-talkie with a fully charged battery is a potential life-saving communicating device in an emergency.  I program my HT with the repeaters local to the area I will be backpacking in before I go.  I also monitor NOAA weather radio transmissions on my HT for potential hazards.

Good DX and 73, NJ2X


Related Articles:


© Michael W. Maher and NJ2X.COM, 2020. Unauthorized use and/or duplication of this material without express and written permission from this blog’s author and/or owner is strictly prohibited. Excerpts and links may be used, provided that full and clear credit is given to Michael W. Maher and NJ2X.COM with appropriate and specific direction to the original content.