Many backpackers prefer camping with a lightweight tarp shelter versus a traditional tent due to the weight savings, cost advantage, and convenience that a tarp shelter provides. In this article, I explore the tarp shelter in detail. I made the switch to backpacking with tarp shelters many years ago and these shelters have served me very well through all kinds of weather and conditions. I hope this article inspires you to give a tarp shelter a try on your next backpacking adventure.
 |
| Tarp shelter in use somewhere in the John Muir Wilderness |
What is a tarp shelter?
A tarp shelter is a lightweight and simple shelter consisting of a tarp, 550 cord, stakes, and trekking poles. There are many different ways to construct a tarp shelter.
Why use a tarp shelter?
A tarp shelter is an attractive alternative to a tent because of its weight savings, low cost, and simplicity. Weight is an important consideration for wilderness backpackers. A tarp shelter is also helpful in a survival situation when a tent is unavailable. A tarp shelter is very inexpensive, costing only a few dollars to construct using a common utility tarp and a few on-hand items. Tarp shelters are also easy to set up and tear down. Setup/tear-down speed is an especially nice advantage when it is raining.
What are the disadvantages of a tarp shelter?
Tarp shelters are typically open to the elements on one or more sides, meaning rain, snow, or insects can potentially intrude on your sleep. Unlike a tent, a tarp shelter does not provide a waterproof pan or offer much protection to your sleeping bag during a heavy rain. This risk can be mitigated, though, by adding a waterproof bivy sack, which would also add extra warmth, and a small tarp as a floor under the sleeping bag, which would provide an additional layer of protection against dampness. Also, adding a mosquito head-net would mitigate the risk of insect bites while you sleep.
Condensation is often a challenge with tent camping. How about with tarp shelters?
Condensation is never a problem with tarp shelters, provided the construction of the shelter includes openings for ventilation.
How many lengths of cord should you pack for use as tarp shelter guy-lines?
I typically pack six lengths of 550-cord for setting up my tarp shelters: two 4-ft lengths (1.2 m), two 6-ft lengths (1.8 m), and two 8-ft lengths (2.4 m). Packing multiple lengths of cord allows me to set up my tarp shelter in different configurations to fit the conditions.
What types of knots are used for the guy-lines?
I like to use bowline knots and taut line hitches, tying a bowline knot on one end of each guy-line and a taut line hitch on the other end. The bowline knot is useful to attach to the tarp, while the taut line hitch provides adjustable tensioning when attached to a stake.
 |
| Bowline knot |
|
 |
| Taut line hitch |
|
What is the optimal height to set my trekking poles for my tarp shelter?
There is no optimal pole height because the pole height will be determined by the type of tarp shelter you decide to build and your needs. If you want more headroom, increase the height. If you want better rain runoff, increase the height. If you want less exposure to the wind or rain, decrease the height. If you are using the lean-to shelter and want a better view of the night sky, increase the height. The beauty of using trekking poles and guy-lines with taut line hitches is that everything can be adjusted easily - even in the middle of the night if needed.
Are there any tricks to staking?
When staking, angle the stake away from the guy-line to provide more secure support. If the ground is soft, place a good-sized rock on top of the stake to help it stay put all night. Pound the stakes all the way to the ground to reduce tripping hazards in camp and to maximize the holding power of the stake. Common lightweight metal camping stakes will work fine. Avoid plastic stakes since they are bulky and not as durable.
Do I need to purchase a special tarp designed for camping purposes, or can I use a common utility tarp from a hardware store?
Inexpensive utility tarps from a hardware store are durable and work just fine and can be purchased starting at around $5 USD. The inexpensive utility tarps are preferred by those of us who are thrifty or are just getting started in backpacking. The more expensive backpacking tarps offer more features like durability, versatility, and additional weight savings, and are preferred by through-hikers and the ultra-light crowd where saving grams is the goal.
How do you pitch a tarp for rain?
All of the tarp shelters described in this article will help protect against rain.
What are the pros and cons between the basic tarp shelter options?
- Lean-to Tarp Shelter
- Pros
- Quick and easy to set up
- Good rain runoff
- Good protection from sun, wind, and rain on one side
- Provides a nice view of the night sky for bedtime meteor-watching
- Cons
- No floor, so no protection when setting up on ground that might already be damp
- Not ideal for heavy wind or rain
- A-Frame Tarp Shelter
- Pros
- Good rain protection and rain runoff
- Good wind protection on two sides
- Flexible
- Cons
- No dampness protection when setting up on ground that might already be damp
- No view of the night sky
- C-Fly Tarp Shelter
- Pros
- You can still see some portion of the night sky from your sleeping bag
- Good rain runoff
- Good protection from sun, wind, and rain on one side
- The tarp fold on the ground acts as a floor, providing additional protection when setting up on ground that might already be damp
- Cons
- A little more complex to set up
- Requires more stakes than the other shelters (8 stakes total)
- Limited view of the night sky
What materials are needed to construct a tarp shelter?
- Lean-To Tarp Shelter
- 4 stakes
- 2 lengths of 550 cord
- 2 trekking poles or a couple of foraged sticks
- Tarp
- A-Frame Tarp Shelter
- 6 stakes
- 2 lengths of 550 cord
- 2 trekking poles or a couple of foraged sticks, or run a ridge line between two trees
- Tarp
- C-Fly Tarp Shelter
- 8 stakes
- 4 lengths of 550 cord
- 2 trekking poles or a couple of foraged sticks
- Tarp
What do the tarp shelters look like when set up?
- Lean-To Tarp Shelter (shown with a 5-ft x 7-ft tarp)
 |
| Lean-To Tarp Shelter shown with optional bivy sack |
- A-Frame Tarp Shelter (show with an 8-ft x 10-ft tarp)
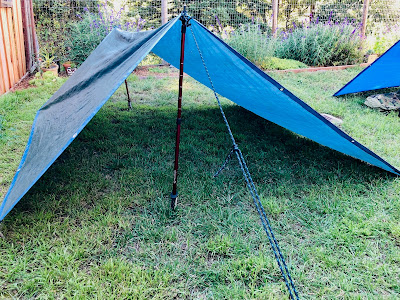 |
| A-Frame Tarp Shelter |
- C-Fly Tarp Shelter (shown with a 6-ft x 8-ft tarp)
 |
| C-Fly Tarp Shelter |
What are the steps to set up a tarp shelter?
It is generally easier to set up a tarp shelter for the first time using a photo as a reference or having an experienced tarp camper guide you. However, for those who prefer step-by-step instructions, here they are. Don't worry if you struggle the first time; with practice, you will quickly find what works best for you.
Lean-To Tarp Shelter
- Choose your location wisely
- Open the tarp and position it
- Using two stakes, stake down one side (two bottom corners) of the tarp
- Stand up a trekking pole with the handle pointed down and adjust it to the desired height
- Attach a bowline loop to a trekking pole tip, insert it through a tarp grommet, then twist the loop and flip it over the trekking pole tip. Cinch the loop so it is firm around the pole tip and tarp grommet.
- Attach the taut line hitch to the stake and insert it into the ground so that the cord line is at a 45-degree angle from the corner of the tarp
- Repeat steps 4, 5, and 6 for the other tarp corner
- Adjust the guy-line tension using taut line hitches
A-Frame Tarp Shelter
- Choose your location wisely
- Open the tarp and position it
- Using two stakes, stake down one side (two left corners) of the tarp
- Stand up a trekking pole with the handle pointed down and adjust it to the desired height
- Insert the trekking pole into the center grommet of the tarp to form a peak
- Using two stakes, stake down the right side of the tarp with the trekking pole in place
- Attach a bowline loop to a trekking pole tip, insert it through a tarp grommet, then twist the loop and flip it over the trekking pole tip. Cinch the loop so it is firm around the pole tip and tarp grommet.
- Attach the taut line hitch to the stake and insert it into the ground so that the cord line is at a 90-degree angle from the tarp
- Repeat steps 6, 7, and 8 for the other tarp peak
- Adjust the guy-line tension using taut line hitches
C-Fly Tarp Shelter
- Choose your location wisely
- Open the tarp and position it
- Using four stakes, stake down one end of the tarp to make a 'floor'
- Stand up a trekking pole with the handle pointed down and adjust it to the desired height
- Attach a bowline loop to a trekking pole tip, insert it through a tarp grommet, then twist the loop and flip it over the trekking pole tip. Cinch the loop so it is firm around the pole tip and tarp grommet.
- Attach the taut line hitch to the stake and insert it into the ground so that the cord line is at a 90-degree angle from the side of the tarp
- Repeat steps 4, 5, and 6 for the other side of the tarp
- Pass the bowline knot through the front corner tarp grommet and feed the guy-line through the bowline loop, attaching the cord line to the tarp
- Repeat step 8 for the other front tarp corner
- Attach the taut line hitch to the stake and insert it into the ground so that the line is at a 90-degree angle from the front of the tarp
- Repeat step 10 for the other front corner guy-line
- Adjust all guy-line tension using taut line hitches
I hope this article has inspired you to give backpacking with a tarp shelter a try. A great way to get started is to practice setting up your tarp shelter in your own backyard. This will help you gain experience and confidence before heading out into the backcountry.
Happy backpacking,
Michael (NJ2X)
© Michael W. Maher and NJ2X.COM, 2020. Unauthorized use and/or duplication of this material without express and written permission from this blog’s author and/or owner is strictly prohibited. Excerpts and links may be used, provided that full and clear credit is given to Michael W. Maher and NJ2X.COM with appropriate and specific direction to the original content.


