August 29, 2020

Repairing Portable Rotatable Dipole

For portable operations, we have been using a portable rotatable HF dipole from EmComm-Products (model RADS 9-11/A) since 2008.  The antenna provides HF (160m, 80m, 40m, and 20m) and a second VHF/UHF antenna on top of the dipole which is fed by a separate cable enabling concurrent operations of both a HF and VHF/UHF radio on one mast.

Activating Hatteras Island, NC

KC2VSR (Field Day at Fort Ord, CA) rotating the dipole by giving the mast a simple twist


When setting up the antenna for portable operations to teach the radio merit badge in 2018, we discovered that we could no longer tune up when using the 20m elements.  SWR was extremely high.  The was the first time we had an issue when using the antenna after a decade of use.  It was time to give the antenna some attention and bring it back to working order. 

Diagnosis

Once back home, we brought out each of the elements and check them individually for continuity using a ohmmeter.  To perm this test, we placed one of the ohmmeter probes on one end of an antenna element and the other problem on the other end of the antenna element.

All the elements passed this basic test with the exception of one of the 20m elements.  The 20m element had no continuity indicating that the wire had a break somewhere along the fiberglass element.

I visually inspected the element for apparent damage and found none.  This suggested that something was amiss with connection between the wire and one or both end connectors.

Corrosion on the joint between the antenna wire and antenna connector


Using an X-acto knife I carefully cut a window in the shrink wrap at the junction between the antenna element wire and the end connector to inspect the connection.  This revealed corrosion on the junction.  Using the continuity tester, I checked for continuity between the wire and both end connections.  This showed continuity at the junction to the far end connector and no continuity to the near connector.  Ah ha!  We found the issue.  The corrosion was likely caused from a decade of operating near saltwater and in the rain.

Repair

A brass wire brush was used to remove the corrosion.  The connector was then resoldered to the wire along with a copper wire wrapped all the way around the connector to assure positive contact.  The connector was recovered with shrink wrap and relabelled as a 20m element.  This was a straightforward and easy repair.

Repaired 20m element

Results

We setup a wilderness radio station to teach the radio merit badge at summer camp with the portable rotatable dipole as one of the antennas.

Portable rotatable dipole back on the air at summer camp near Truckee, CA

We setup the antenna with the 20m elements and it performed flawlessly all week while at summer camp.  We made numerous SSB contacts on 20m.

Several people have contacted me asking about buying their own portable rotatable dipole antenna.  Sadly, the manufacturer, EmComm-Products, is no longer in business.  It has been an outstanding antenna.

Good DX and 73,  
NJ2X


August 21, 2020

Radio Scouting: Earning the Radio Merit Badge at Summer Camp


The Radio Merit Badge was earned by 5,205 Scouts in the US in 2018 representing a 10.9% drop from the year prior.  We hams need to make sure we step up our support of scouting and act as counselors for the radio merit badge.  The Radio Merit Badge requirements are demanding and require both classroom learning as well as applied learning in front of a radio.  The radio merit badge looks great on a scout uniform sash with its wonderfully designed Morse code message and lighting bolts.


Scouts BSA Radio Merit Badge

I had the privilege to teach the radio merit badge with my daughter's Scouts BSA troop while at summer camp in the Sierras in Northern California in 2020.  We had a small group of scouts and parents which provided the scouts with more radio operating time and more time for discussion and questions about radio.  This made the merit badge class sessions more fun and engaging.

The scouts had a blast learning hands-on on how to setup the entire wilderness radio station including:
  1. Generator
  2. Power supply
  3. Kenwood TS-480SAT (HF+6m transceiver)
  4. Yeasu FT-8800 (2m / 70 cm FM transceiver)
  5. Kenwood TH-F6A (triband FM HT)
  6. External speaker
  7. 40 Meters home brew wire dipole
  8. 20 Meters rotatable dipole
  9. VHF/UHF antenna
Emergency communication rotatable dipole and VHF/UHF antenna packed up in its storage bag


The scouts made numerous contacts on 40 Meters, 20 Meters, 2 Meters, and 70 Centimeters.  We also tuned up and down on the shortwave broadcast bands and listened in on various programs from around the world.  This was an eye opening experience for the scouts who had never heard shortwave broadcasting nor made amateur radio contacts before.

Kenwood TS-480SAT Transceiver

The rotatable dipole worked like a champ having been serviced in the work prior to camp.  While on the workshop bench before camp, it was discovered that one of the elements had developed a break due to corrosion.  The repair was straightforward requiring a quick cleaning of the corrosion, resoldering, and shrink-wrapping.  The rotatable dipole helped demonstrate the directional nature of dipole antennas to the scouts.

Emergency communications rotatable dipole with VHF/UHF Antenna on top setup at summer camp 


One of our scouts, Sadie, earned her FCC Amateur Radio Technician license (KN6JYE) just prior to arriving in camp.  She had a blast using her license for the first time on VHF/UHF simplex calls, calls over area repeaters, and checking into various area nets including a fun 2m simplex net.  By the way, Sadie and her troop are running a popcorn fundraiser to help keep their scout program going.  Please stop by Sadie's Trails End popcorn storefront to make a purchase and support scouting and her troop.

Sadie, KN6JYE making contacts at elevation 3187m on top of Mount Lassen, California

The scouts were amazed and excited to experience the thrill of DX communication for the first time.  We made contacts on 40 Meters to other states and countries including Hawaii and New Zealand.  DX is alive and well even at the bottom of the solar sunspot cycle.

Amateur Radio Operator scout uniform strip

A big THANK YOU to the patient hams who talked with the scouts and helped them log their very first amateur radio contacts.  These hams helped the scouts to successfully earn their radio merit badges and we couldn't have done it without them.  It is the hands-on learning and radio operations that is the most inspiring and engaging aspect of the radio merit badge.  Several of the scouts expressed their enthusiastic interest in earning their own amateur radio licenses.  Please support scouting, radio merit badge activities, the annual Scout Jamboree on the Air (JOTA) special event, and youth learning the ropes on the air.  The next generation needs our support and encouragement just as much as we all did when we were their age.  Remember, it is youth who are the future of the amateur radio.

Good DX and 73,

NJ2X


August 20, 2020

Wildfire Evacuation Tactics

It is August 20, 2020, wildfires continue to rage along the central coast of California in Santa Cruz County and the neighboring Santa Clara County affecting tens of thousands of people and tens of thousands of acres.  There is zero containment so far.  Evacuation of entire communities is occurring.


I received a helpful list from a neighbor on preparing for a wildfire evacuation. I am sharing this information in case it is helpful to others.

- BE PREPARED
- TURN ON yard sprinklers.  Turn them off before you evacuate.
- MOVE outdoor furniture / anything flammable to IN garage.
- TAKE DOWN shades 
- CLEAN gutters / leaves of debris
- RUN hose lines around property, brass nozzles are best. 
- Turn OFF natural gas - wrench next to meter 
- Turn ON outdoor house lights (front of house/garage) 
- CLOSE windows and doors - Remove all cloth and plastic curtains 
- EMAIL / TEXT / CALL Let family outside of area know individual / group plans - Leave a letter on kitchen counter of who you are, who is with you and where you are going and how you’re getting there - INFORM all neighbors of your plans and learn theirs 
- MOVE indoor furniture away from windows / doors to center of room 
- MOVE flammable materials to the center of the garage, ideally not on the ground. 
- PLACE extension ladder leading to roof 
- CLOSE OFF roof / eave vents - duct tape 
- DISCONNECT automatic garage door opener, manually close. 
- TAPE any gaps between garage door and ground, so no embers can blow under 
- LEAVE car unlocked with keys in ignition 
- WRITE note and paste to front door informing you have evacuated and the date. Note where the closest fire hydrant is to you. 
- POSITION security cameras to see your surroundings better 
- CUT all branches that are too close to your house. Form pile away from house, not under trees (center of driveway for example) 
- REMOVE flammable plants (lavender, etc) within 3 feet of home 
- HELP your neighbors and COMMUNICATE regularly 
- EVACUATE while you have time on your side

If you are a amateur radio operator, remember, cell phone and internet services are prone to failure.

- BRING your fully charged amateur radio HTs and charger with you (already programmed with your area's repeaters).
- LISTEN to your radio to monitor for news updates.


Do you have additional tactics to add to this list?  Please leave a comment.


Be safe,

NJ2X


July 20, 2020

Anticipation is ... Monitoring the FCC ULS

There is nothing quite like the feeling of happiness and anticipation monitoring the FCC ULS after passing your FCC Technician exam.  What will my call sign be?  I hope it is a good one.  Wouldn't it be amazing if it included my initials?  Has my new call sign posted yet on ULS?  How about now?  Better check again a little later... Where is it!?  Cue the Carly Simon song, anticipation... is making me wait.  

The wait is part of the journey and part of the joy of becoming a ham.  It is just as much fun for Elmers too.


Good DX and 73, 

NJ2X

July 19, 2020

In every walk...

“In every walk with nature one receives far more than he seeks.” – John Muir


July 12, 2020

One's courage...

“Life shrinks or expands in proportion to one’s courage.” – Anais Nin

Death Valley, California


July 5, 2020

Backpacking Hack: Packing Duct Tape

I recently returned from a wonderful backpacking trek in the John Muir Wilderness located in the Sierra Nevada Mountains of California.  The John Muir Wilderness is rugged and exceedingly beautiful.  It is also challenging backpacking country with high altitude and difficult terrain.  The trek tested our group's skills, readiness, and fitness.  Fortunately, we were well prepared and able to handle every test mother nature presented us.

John Muir Wilderness Marker
One item in my pack proved its usefulness over and over again - duct tape.  Duct tape is not just for air ducts or home repairs.  Here are just a few uses of duct tape while backpacking:
  • Repair a pair of shoes by re-affixing a delaminated tread with duct tape
  • Repair a tear in a tent stuff-sack with duct tape
  • Patch a puncture in a water bag with duct tape
  • Secure a moleskin pad with duct tape to prevent it from rubbing off while walking
  • Cover a hip abrasion caused by a backpack with duct tape to prevent further injury
  • Wrap a sprained ankle with duct tape to support the join and prevent further injury
  • Whip an end of rope to prevent fraying
  • Patch a torn tent bag
If you aren't carrying duct tape in your pack then you will inevitably find yourself wishing you had.  Fortunately, you don't have to bring a bulky and heavy roll of duct tape to benefit from this miracle material.  Several feet of tape will do.

A helpful method of packing duct tape is to roll several feet onto a plastic medicine bottle.  The width of the duct tape fits perfectly on the bottle and adds very little weight or volume to a pack.  This hack also provides you with a waterproof container for medicine or small items.  Later, when a length of duct tape is needed, simply peel off the desired amount from the medicine bottle.

You don't need to pack the whole roll

I hope this article has inspired you to add duct tape to your backpacking kit and try rolling it onto a plastic medicine bottle for convenient packing.

Several feet of duct tape rolled onto a plastic medicine bottle

Happy trails and 73, NJ2X


Related Articles:


© Michael W. Maher and NJ2X.COM, 2020. Unauthorized use and/or duplication of this material without express and written permission from this blog’s author and/or owner is strictly prohibited. Excerpts and links may be used, provided that full and clear credit is given to Michael W. Maher and NJ2X.COM with appropriate and specific direction to the original content.

Going far...

“Only those who risk going too far can possibly find out how far they can go.” – T.S Eliot

Yosemite Waterfall

June 28, 2020

Before it gets dark...

“The world is big and I want to have a good look at it before it gets dark.” – John Muir

Mount Kilimanjaro

June 21, 2020

Gained my whole life...

“Then I realized that to be more alive, I had to be less afraid. So I did it. I lost my fear and gained my whole life.” – Anonymous


June 14, 2020

The purpose of life...

“The purpose of life, after all, is to live it, to taste experience to the utmost, to reach out eagerly and without fear for a newer and richer experience.” – Eleanor Roosevelt


June 8, 2020

How to setup backpacking tarp shelters (A-Frame, Lean-To, and C-Fly)

Many backpackers prefer camping with a lightweight tarp shelter versus a traditional tent due to the weight savings, cost advantage, and convenience that a tarp shelter provides.  In this article, I explore the tarp shelter in detail.  I made the switch to backpacking with tarp shelters many years ago and these shelters have served me very well through all kinds of weather and conditions.  I hope this article inspires you to give a tarp shelter a try on your next backpacking adventure.

Tarp shelter in use somewhere in the John Muir Wilderness
What is a tarp shelter?
A tarp shelter is a lightweight and simple shelter consisting of a tarp, 550 cord, stakes, and trekking poles.  There are many different ways to construct a tarp shelter.

Why use a tarp shelter?
A tarp shelter is an attractive alternative to a tent because of its weight savings, low cost, and simplicity.  Weight is an important consideration for wilderness backpackers.  A tarp shelter is also helpful in a survival situation when a tent is unavailable.  A tarp shelter is very inexpensive, costing only a few dollars to construct using a common utility tarp and a few on-hand items.  Tarp shelters are also easy to set up and tear down.  Setup/tear-down speed is an especially nice advantage when it is raining.

What are the disadvantages of a tarp shelter?
Tarp shelters are typically open to the elements on one or more sides, meaning rain, snow, or insects can potentially intrude on your sleep.  Unlike a tent, a tarp shelter does not provide a waterproof pan or offer much protection to your sleeping bag during a heavy rain.  This risk can be mitigated, though, by adding a waterproof bivy sack, which would also add extra warmth, and a small tarp as a floor under the sleeping bag, which would provide an additional layer of protection against dampness.  Also, adding a mosquito head-net would mitigate the risk of insect bites while you sleep.

Condensation is often a challenge with tent camping.  How about with tarp shelters?
Condensation is never a problem with tarp shelters, provided the construction of the shelter includes openings for ventilation.

How many lengths of cord should you pack for use as tarp shelter guy-lines?
I typically pack six lengths of 550-cord for setting up my tarp shelters: two 4-ft lengths (1.2 m), two 6-ft lengths (1.8 m), and two 8-ft lengths (2.4 m).  Packing multiple lengths of cord allows me to set up my tarp shelter in different configurations to fit the conditions.

What types of knots are used for the guy-lines?
I like to use bowline knots and taut line hitches, tying a bowline knot on one end of each guy-line and a taut line hitch on the other end.  The bowline knot is useful to attach to the tarp, while the taut line hitch provides adjustable tensioning when attached to a stake.


Bowline knot

Taut line hitch

What is the optimal height to set my trekking poles for my tarp shelter?
There is no optimal pole height because the pole height will be determined by the type of tarp shelter you decide to build and your needs.  If you want more headroom, increase the height.  If you want better rain runoff, increase the height.  If you want less exposure to the wind or rain, decrease the height.  If you are using the lean-to shelter and want a better view of the night sky, increase the height.  The beauty of using trekking poles and guy-lines with taut line hitches is that everything can be adjusted easily - even in the middle of the night if needed.

Are there any tricks to staking?
When staking, angle the stake away from the guy-line to provide more secure support.  If the ground is soft, place a good-sized rock on top of the stake to help it stay put all night.  Pound the stakes all the way to the ground to reduce tripping hazards in camp and to maximize the holding power of the stake.  Common lightweight metal camping stakes will work fine.  Avoid plastic stakes since they are bulky and not as durable.

Do I need to purchase a special tarp designed for camping purposes, or can I use a common utility tarp from a hardware store?
Inexpensive utility tarps from a hardware store are durable and work just fine and can be purchased starting at around $5 USD.  The inexpensive utility tarps are preferred by those of us who are thrifty or are just getting started in backpacking.  The more expensive backpacking tarps offer more features like durability, versatility, and additional weight savings, and are preferred by through-hikers and the ultra-light crowd where saving grams is the goal.

How do you pitch a tarp for rain?
All of the tarp shelters described in this article will help protect against rain.

What are the pros and cons between the basic tarp shelter options?
  1. Lean-to Tarp Shelter
    • Pros
      • Quick and easy to set up
      • Good rain runoff
      • Good protection from sun, wind, and rain on one side
      • Provides a nice view of the night sky for bedtime meteor-watching
    • Cons
      • No floor, so no protection when setting up on ground that might already be damp
      • Not ideal for heavy wind or rain
  2. A-Frame Tarp Shelter
    • Pros
      • Good rain protection and rain runoff
      • Good wind protection on two sides
      • Flexible
    • Cons
      • No dampness protection when setting up on ground that might already be damp
      • No view of the night sky
  3. C-Fly Tarp Shelter
    • Pros
      • You can still see some portion of the night sky from your sleeping bag
      • Good rain runoff
      • Good protection from sun, wind, and rain on one side
      • The tarp fold on the ground acts as a floor, providing additional protection when setting up on ground that might already be damp
    • Cons
      • A little more complex to set up
      • Requires more stakes than the other shelters (8 stakes total)
      • Limited view of the night sky
What materials are needed to construct a tarp shelter?
  1. Lean-To Tarp Shelter
    • 4 stakes
    • 2 lengths of 550 cord
    • 2 trekking poles or a couple of foraged sticks
    • Tarp
  2. A-Frame Tarp Shelter
    • 6 stakes
    • 2 lengths of 550 cord
    • 2 trekking poles or a couple of foraged sticks, or run a ridge line between two trees
    • Tarp
  3. C-Fly Tarp Shelter
    • 8 stakes
    • 4 lengths of 550 cord
    • 2 trekking poles or a couple of foraged sticks
    • Tarp

What do the tarp shelters look like when set up?
  1. Lean-To Tarp Shelter (shown with a 5-ft x 7-ft tarp)

    • Lean-To Tarp Shelter
      Lean-To Tarp Shelter shown with optional bivy sack
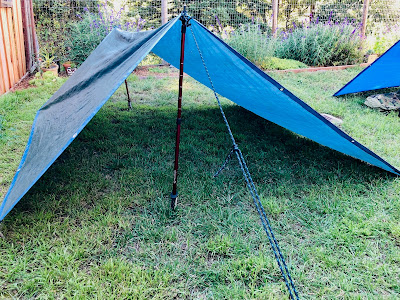
  2. A-Frame Tarp Shelter (show with an 8-ft x 10-ft tarp)
    • A-Frame Tarp Shelter
      A-Frame Tarp Shelter
  3. C-Fly Tarp Shelter (shown with a 6-ft x 8-ft tarp)

    • C-Fly Tarp Shelter
      C-Fly Tarp Shelter
What are the steps to set up a tarp shelter?
It is generally easier to set up a tarp shelter for the first time using a photo as a reference or having an experienced tarp camper guide you.  However, for those who prefer step-by-step instructions, here they are.  Don't worry if you struggle the first time; with practice, you will quickly find what works best for you.

Lean-To Tarp Shelter
    1. Choose your location wisely
    2. Open the tarp and position it
    3. Using two stakes, stake down one side (two bottom corners) of the tarp
    4. Stand up a trekking pole with the handle pointed down and adjust it to the desired height
    5. Attach a bowline loop to a trekking pole tip, insert it through a tarp grommet, then twist the loop and flip it over the trekking pole tip. Cinch the loop so it is firm around the pole tip and tarp grommet.
    6. Attach the taut line hitch to the stake and insert it into the ground so that the cord line is at a 45-degree angle from the corner of the tarp
    7. Repeat steps 4, 5, and 6 for the other tarp corner
    8. Adjust the guy-line tension using taut line hitches
A-Frame Tarp Shelter
    1. Choose your location wisely
    2. Open the tarp and position it
    3. Using two stakes, stake down one side (two left corners) of the tarp
    4. Stand up a trekking pole with the handle pointed down and adjust it to the desired height
    5. Insert the trekking pole into the center grommet of the tarp to form a peak
    6. Using two stakes, stake down the right side of the tarp with the trekking pole in place 
    7. Attach a bowline loop to a trekking pole tip, insert it through a tarp grommet, then twist the loop and flip it over the trekking pole tip.  Cinch the loop so it is firm around the pole tip and tarp grommet.
    8. Attach the taut line hitch to the stake and insert it into the ground so that the cord line is at a 90-degree angle from the tarp
    9. Repeat steps 6, 7, and 8 for the other tarp peak
    10. Adjust the guy-line tension using taut line hitches
C-Fly Tarp Shelter
    1. Choose your location wisely
    2. Open the tarp and position it
    3. Using four stakes, stake down one end of the tarp to make a 'floor'
    4. Stand up a trekking pole with the handle pointed down and adjust it to the desired height
    5. Attach a bowline loop to a trekking pole tip, insert it through a tarp grommet, then twist the loop and flip it over the trekking pole tip. Cinch the loop so it is firm around the pole tip and tarp grommet.
    6. Attach the taut line hitch to the stake and insert it into the ground so that the cord line is at a 90-degree angle from the side of the tarp
    7. Repeat steps 4, 5, and 6 for the other side of the tarp
    8. Pass the bowline knot through the front corner tarp grommet and feed the guy-line through the bowline loop, attaching the cord line to the tarp
    9. Repeat step 8 for the other front tarp corner
    10. Attach the taut line hitch to the stake and insert it into the ground so that the line is at a 90-degree angle from the front of the tarp
    11. Repeat step 10 for the other front corner guy-line
    12. Adjust all guy-line tension using taut line hitches

I hope this article has inspired you to give backpacking with a tarp shelter a try.  A great way to get started is to practice setting up your tarp shelter in your own backyard.  This will help you gain experience and confidence before heading out into the backcountry.

Happy backpacking,

Michael (NJ2X)


© Michael W. Maher and NJ2X.COM, 2020. Unauthorized use and/or duplication of this material without express and written permission from this blog’s author and/or owner is strictly prohibited. Excerpts and links may be used, provided that full and clear credit is given to Michael W. Maher and NJ2X.COM with appropriate and specific direction to the original content.

April 11, 2020

A Ham's Complete Backpacking Checklist for Northern California

So what do you pack for a backpacking adventure in Northern California?  Here is a tried and true checklist we have used on past adventures with good results.  A big thank you to my backpacking partners for sharing their knowledge with me over the years.  Their combined experience along with my own are reflected in this list.

There are several guiding principles to consider when choosing what to bring on a backpacking adventure:
  • Be prepared
  • Be safe
  • Pack the ten essentials
  • Pack as lightly as possible and no more than you can manage

NJ2X with his pack on the trail in the John Muir Wilderness in Northern California